Saturday, June 28, 2008
Spin Art
Materials:
Cheap salad spinner (She purchased hers for under $3.00 at the grocery store)
Acrylic Paint - in various colors
Paper - construction works great!
Pencil/Pen
Scissors
something to cover your work area - newspaper, cheap plastic tablecloth, etc
optional: disposable pan or disposable plastic lid
Click here to get to the Brassy Apple post on how to make spin art. Have fun!
Thursday, June 26, 2008
Water Painting
No preparation and no cleanup and your child will have a great time! There won't be many opportunities to give your toddler a paintbrush and the freedom to paint anything he desires. With a bucket of water and some paintbrushes, outside of course, your child can paint the house, the fence, his trike, or make designs and patterns on the sidewalk.
Step by Step:
1. Fill a bucket with water.
2. Make sure you don't put too much water in the bucket, you want it light enough so your child can carry it without your help.
3. Give him paint brushes, roller, sponges, or anything you can think of that makes for fun painting.
4. If your child paints on the sidewalk, point out how his painting disappears because the water has dried.
5. Stress the fact that this is an OUTSIDE activity using water instead of paint.
Materials:
Small plastic bucket with handles
Paint brushes of various sizes
Paint roller
Wednesday, June 25, 2008
Birthday Traditions
1. Have a special Birthday Plate. The example I saw was a bright red one. The birthday kid gets to use the special plate. (You can also make it a Celebration Plate. Whenever someone has a special thing to celebrate, such as a good grade, winning a ball game, getting a merit badge, etc, they get to use the special plate. It makes the kids feel special)
2. Decorate their bedroom while they are sleeping. What fun it would be too look forward to a fun room when you wake up in the morning.
3. Birthday kids always got to pick what we had for dinner when I was growing up.
4. Make opening presents into a treasure hunt. Use clues to lead them around until they find the gifts.
The point of these traditions in to make the child feel special and teach them that they are of value. Also, when the sibling know they will have their own turn on their birthday, it give them a chance to help their brother or sister feel special and the celebrate with them.
Please share any birthday traditions with us. Or any traditions at all. Post them as a comment or email us and we will post them on the blog. We would love to hear from you.
Tuesday, June 24, 2008
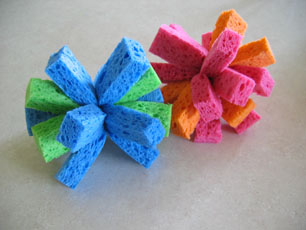
Sponge Toys
I've seen these fun toys on a lot of blogs, but I first saw them at makeandtakes.com (one of my favorite blogs) She explains easily how to make them.
Needed:
New kitchen sponges (3x5 or 5x7)
Zip ties
Scissors
For step by step instructions click here.
Summer Relay Races
Sunday, June 22, 2008
Pudding Paint
I'm sure there are other ways (maybe less messy ways) of using pudding to finger paint. I remember being little in Joy School, and we finger painted with pudding on butcher paper or large construction paper. I can't remember which. Plus, once they are done, they can eat the extra pudding for a snack.
Have fun painting!
Saturday, June 21, 2008
All Work And No Play...
The author of organizedeveryday.blogspot.com has a post about how she deals with her toddler. She sets a timer (she uses 12 minutes but any amount of time would work. I would suggest short times for younger children.) She plays with her daughter till the timer goes off. Then she sets the timer again and works for the next 12 minutes. Often times her daughter helps with the work. When the timer goes off, they start the cycle over again. They break for lunch and such. She said she gets a lot done during the day, but feels like she has had quality time with her daughter.
What a great way to teach your children the importance of balance in life and the importance of work. Also, by organizing your day, you are a lot less stressed.
Please email us with any ideas on how you organize your day with your children. The struggle between play and house work, I feel, is a universal one. We would love to hear you ideas!
Friday, June 20, 2008
Tvala Handmade
Food for the Fourth
3 cups vanilla yogurt
Red food coloring
Blue food coloring
Waxed paper
Sugar cones
Popsicle sticks
1. To make a half dozen pops, tint 1/2 cup of the yogurt with red food coloring and 1 1/2 cups with blue food coloring. Leave the rest plain. 2. Make waxed paper cone liners by folding six 12-inch square sheets into triangles, wrapping each around a sugar cone, and using tape to hold the shape. Then place the paper cones inside the sugar cones. 3. Fill each cone with 1 tablespoon red yogurt, followed by 2 tablespoons white yogurt, then 3 tablespoons blue yogurt. Insert a Popsicle stick and freeze the pops until firm, about 4 hours, using the cone box to keep them upright .
Thursday, June 19, 2008
Geocaching
Some girls at work were telling me about this. It's pronouned "geo-cashing" like cashing a check.
Geocaching is an outdoor treasure-hunting game in which the participants use a Global Positioning System (GPS) receiver or other navigational techniques to hide and seek containers (called "geocaches" or "caches") anywhere in the world. A typical cache is a small waterproof container containing a logbook and "treasure," usually toys or trinkets of little value. Today, well over 800,000 geocaches are registered on various websites devoted to the pastime. Geocaches are currently placed in over 100 countries around the world and on all seven continents, including Antarctica. (wikipedia)
My friend L did it when her family went to West Virginia. You find the GPS coordinates only. You find the area and such for the "prize." L had purchased souvenirs from Utah, and when they found the "prize" they left their "prize" in it's place.
You need a GPS receiver and to sign up at the Offical Geocaching website (It's free). Let me know if anyone out there has tried it. It sound like a fun family activity. It would be a modern day treasure hunt.
****The official site (www.geocaching.com) answers any questions you may have.Happy Hunting
Wednesday, June 18, 2008
The 7 Habits
1. Write a Family Mission Statement. This way the whole family is working towards a single goal. The book has some great ideas on how to do this. There are also a couple websites that can help you get started. I don't think the sites are as insightful, but a good starting point.
www.ehow.com
www.christian-parent.com
2. Have weekly family meetings. In my family we have Family Home Evening (FHE) on Monday nights. But you can even have a meeting over a family dinner. Make it a special occasion. Make it consistent. Make it a time to share your feelings with each other and also you plans for the week known.
3. Have a Compliment Night. You can do this during you weekly family meeting if you would like. You pick one person for each Complement Night. Then everyone else in the family shares a positive thing about that person. The home should be a place to build each other up, not to tear them down.
It you get a chance to read the book (or listen to it like I have) I would hope you do. The great thing about reading books like this is you can take from it what you want and leave the rest behind.
Tuesday, June 17, 2008
Fourth Of July Crafts
CRAFT MATERIALS: | |
Acrylic paint | |
Drinking straw | |
Paintbrush | |
Paper (or card stock) | |
Water | |
Time needed: 30 Minutes or Less |
2. Using a paintbrush, drip a few drops of paint onto a piece of paper or card stock (be sure to rinse the brush between colors), then hold a drinking straw directly over each puddle of paint and blow gently to create a spectacular starburst effect.
CRAFT MATERIALS: | |
Balloon | |
Ribbon | |
Dried lentils | |
Time needed: 30 Minutes or Less |
Time to run around and get some exercise.
Sunday, June 15, 2008
Door Wreath
What you'll need:
- 2 miniature paper plates
- Star-shaped foam stamp
- Red acrylic paint
- Red and blue glitter glue
- Gold alphabet stickers
- Patriotic star garland
- White craft glue
- White yarn
- Scissors
How to make it:
- Cut a piece of yarn to 14” in length.
- Cut patriotic garland into six 16” pieces.
- Glue two paper plates together so that they are both facing toward each other.
- While glue on plates is still wet, place yarn into the top between the two plates, insert about an inch of each end between the plates. Do the same with the garland lengths, securing them between the bottom of the paper plates. Let dry completely.
- Paint star-shaped foam stamp with a thin layer of red paint. Press carefully but firmly into the center of the plate (don’t smash the plate) and lift straight up to remove.
- Use a paintbrush to fill in any spots on the star that may not have transferred from the stamp.
- Squeeze some red glitter glue onto the center of the red star and spread out using a small paintbrush, covering entire star.
- Use white glitter glue to draw a border around the star.
- Use blue glitter glue to draw a border around the plate edge. Let dry completely.
- Apply alphabet stickers to the top of the plate, spelling out “WELCOME”.
- Wrap the garland around your fingers in a corkscrew fashion to create curls. Stretch them out and manipulate with your hands to get them how you want them.
- Hang on your door!
Tips:
- Check your local craft supply, discount department and party supply stores for patriotic garland.
- Set project somewhere safe and out of place to dry. Avoid areas where pet cats may jump up to investigate.
- Styrofoam plates or even bowls may be used in place of paper plates.
Saturday, June 14, 2008
Schedules and Charts
"The kids have been taking piano lessons for about a month and their teacher has the most organized home I have ever seen. There is a place for everything and everything is in its place.
When we were there this afternoon she let me snap a few photos. I have to pace myself since I'm posting photos for thirty days but there are more to come.
I thought some of you might be interested in the lists she keeps on her fridge in case you want to make your own."
Some great ideas. Not only can you get organized in your family with these ideas, but it can save you time. Once your kids know the rules, they can know what to expect when they do not follow them. The schedule also help you save time. It's a good habit to teach your children at a young age. My husband is excellent at this. Hopefully Baby D learns from him.
You can use this idea as an FHE lesson. Teach the importance of obedience and rules. Have a little family council to discuss what rules you should have in you family and what the consequences are for breaking the rules. Children are much more likely to obey if they have a say in what is going on.
Friday, June 13, 2008
Story Time Dress-up
We all know how important it is to read to our children. Why not make story time a little more fun? How your kids use their imaginations and dress up like one of the characters in the book you are going to be reading together. If it is a chapter book that you will be reading from every night, hey could dress-up like a different character every night, or just pick their favorite. Be creative. You can do a lot with brown paper grocery bag and crayons.
Thursday, June 12, 2008
Gospel ABC's
At www.theideadoor.com they have a great idea for a gospel ABC book. You could either print the pages or just use the ideas for each letter to make your own. Have your children help. When my ward did if for a Super Saturday a few years ago, we used those cheap 4X6 photo albums. Click here for the PDF File.
What a great way to teach young children about the gospel.
Wednesday, June 11, 2008
Summer Chore Chart
If anyone else has good ideas to help get your kids to do chores, please email them.
Tuesday, June 10, 2008
Homemade Beanbags
Free Pattern from grandrevivaldesign.typepad.com. She has a fun blog. If you like to sew she has a couple for fun free patterns on the right side bar.
Monday, June 9, 2008
Dance Time
If anyone else has some good "get up and go" activities, please email them to me. I always need a good way to get exercise with kids, because I don't have time to do it alone.
Saturday, June 7, 2008
Paper Airplanes
Thursday, June 5, 2008
Color Coding
"For example, my youngest, Duncan, is the color orange. He has his own orange dishes, towels, sheets, a can coozie, and a toothbrush - just to name a few. I even have little orange colored star stickers to place on some of the things he frequently uses that aren't available in the color orange. I keep the family calendar in Palm Desktop on my computer and have even color coded his activities in orange."
Now she can figure out who is leaving their stuff out, who forgets to put their dishes in the sink, Who doesn't place their towel in the dirty clothes, etc. Click here to ready the whole story. What a great idea to help kids learn to keep track of their own things and to clean up after themselves.
Math Is Fun
In the Kitchen. Find a recipe with lots of fractions and double or halve it. Operations involving fractions are often tricky for kids to grasp, applying that to a real world skill such as cooking can be helpful - and have tasty results!
At the Store. Play the estimation game, round the prices of the items you buy to the nearest fifty cents and estimate how much your total bill will be. Keep track on a piece of paper or for an extra challenge keep track in your head. Give your littlest kids a copy of the sales flyer and have them choose a number and see how many times they can find that number in the ad. At home when you're writing out your list, let your kids look through the sales flyer and make a list of what they would buy if they had $10 to spend.
On the Road. Older kids can calculate gas mileage. Younger kids can practice their subtraction skills by figuring out how many miles you have left to drive or how many hours are left in your trip. When preparing for your road trip, give your kids a map and see if they can figure out how many miles you will need to drive, or how many states you will pass through.
Wednesday, June 4, 2008
Have A Ball Decorating
Needed:
scissors
paper
hole punch
large brads
string or yarn (if you want to hang them)
All you would need to do is cut out numerous strips of paper all the same size. You stack 6 to 8 on top of each other. (You could try more. Just depends on what you want it to look like) Punch a hole at both ends of the stack. Place a brad through the hole. Once the brads are secure, fan our the papers into a ball. They remind me of Chinese lanterns. I made one and it was very easy. They store well too if you decide to keep them. You just push all the strips together till if forms the stack again. (I hope that made sense) Hope you have a ball with this idea.
Tuesday, June 3, 2008
Sidewalk Chalk Paint
-liquid food coloring (like what you find in the spice section at the grocery)
-box o' corn starch
-water
-minimum 8 oz individual containers for each color
Method:
-Measure 1/4 cup cornstarch into each cup.
-Add 1/4 cup water to each.
-Drip in 5-10 drops of food coloring.
-Stir it up. At first it will seem as though the cornstarch just won't mix in, but all at once it comes together. Just don't put the water in first or it's significantly tougher to get it to mix up.
(librarycollective.blogspot.com)